Can this be restored?
What is ‘restoration’?
In this context, ‘leather restoration’ refers to cosmetic leather repairs and new colour coatings. It’s all about repairing damage, slowing further breakdown and getting your leather looking great again.
Whilst we refer to sofas, the same information applies to leather upholstery in other applications such as cars and boats as well as on handbags and apparel.
Reasons for restoring vary, as do results.
- Sentimental value
- Minimising consumption for the sake of the planet
- Afforability of new furniture/upholstery
- The time isn't right for new
- Conserving vintage and valuable pieces
- New retail offerings may not compare well in terms of quality and durability
- A lack of appealing styles in stores
There are many good reasons to repair and maintain leather before even considering throwing it out.
Don't throw it out, repair & refinish it
Lots of typical leather mishaps can be improved with some timely repair and recolour work. In fact, your enjoyment and the lifespan of your leather can be significantly extended as a result of coatings maintenance.
Let's review some examples of the type of problems that can be restored to deliver pleasing results.
- Delamination (flaking of original coatings)
- Colour wear, scuffs and scratches
- Indelible stains
- Detailing (deep clean and condition)
- Colour change
- Tears (especially in non-load bearing areas)
- Pet damage
- UV fading
- Oily areas. Small or mildly affected oily areas can usually be sucessfully refinished
- Old & valuable pieces can be restored to help to protect and preserve rare pieces for years to come
- Peeling man-made leathers. Early intervention can slow degradation
Successful repairs: Before & After examples


Before: Delamination
‘Delamination’ describes the breakdown and flaking of original coatings. It typically feels rough to touch. The leather can be seen in places where there are no longer any colour coatings. The cuticle of the leather may be open and fibrous. Varying degrees of delamination can occur. Typically delamination occurs on areas exposed to body oil and perspiration. Look for a Repair & Recolour Kit


After: Smoothed & refinished
With thorough surface prep, delaminated leather can usually be successfully recoated using a Repair & Recolour Kit. Leather Binder and Filler can be used to stabilise and smooth an open and fibrous surface before doing colour work.


Before: Old & Valuable
This iconic 1970’s Anfibio sofa bed by Alessandro Becchi was stained, colour-worn, dry and cracked. The quality, plus the designer and historical value of the piece made it ideal for restoration. It was decide to replicate the original colour.


AFTER: A new lease on life
New coatings provide protection to leather. A Repair & Recolour Kit was used to refinish this piece.


Before: COLOUR WEAR
After years of use, colour coatings can wear in hight traffic zones. Soiling can embed into the coatings making the colour and finish look drab.


After: Refinished with new coatings
The leather was refinished using a Repair & Recolour Kit. The kit includes a full refinishing system that replicates the coatings that were applied to the pigmented leather when it was manufactured. As the leather is older, the durability may not be as long as the original finish but it's valuable to have the ability to recoat leather so that it looks great throughout the years.


Before: Stains on pigmented leather
Various paint spills and marks made this seat look messy. Efforts were made to remove the marks but there proved indelible.


After: Marks covered with new coatings
In line with the original coatings, the seat was refinished with leather paint using a Repair & Recolour Kit. The marks were effectively concealed.


Before: Perishing Man Made Leather
The thick upper layer of this man-made leather was crumbling, peeling and flaking. A flaking substate can continue to degrade even after new coatings are applied. It was important to remove the failing upper layer first.


After: Scraped and recoloured
The loose and crumbing layer was scraped and sanded off then 2 leather paint colours were applied by hand to render a softly mottled effect similar to the original. A Repair & Recolour Kit plus an extra Colour (No.6) was use for this job. Repairs to faux leathers are unpredicatable. In this instance, the bedhead was so heavy it couldn't be moved without incurring lots of expense for removal and upholstery services. The owners were keen to try a repair before attempting to move it.


Before: Soiled, damaged and dry
A treasured vintage saddle was dry, dusty, stained, scuffed and the surface was eaten into by insects. The owner wanted to clean it up then display it as an objet d'art. The goal was too enhance the leather whilst keeping all of the battle scars.


AFTER: Cleaned & Polished
Spot & Prep (No.4) and some detailed scrubbing cleaned the leather of soiling. Waxy Nourish (No.9) was used to moisturise and polish it to a luxurious shine.
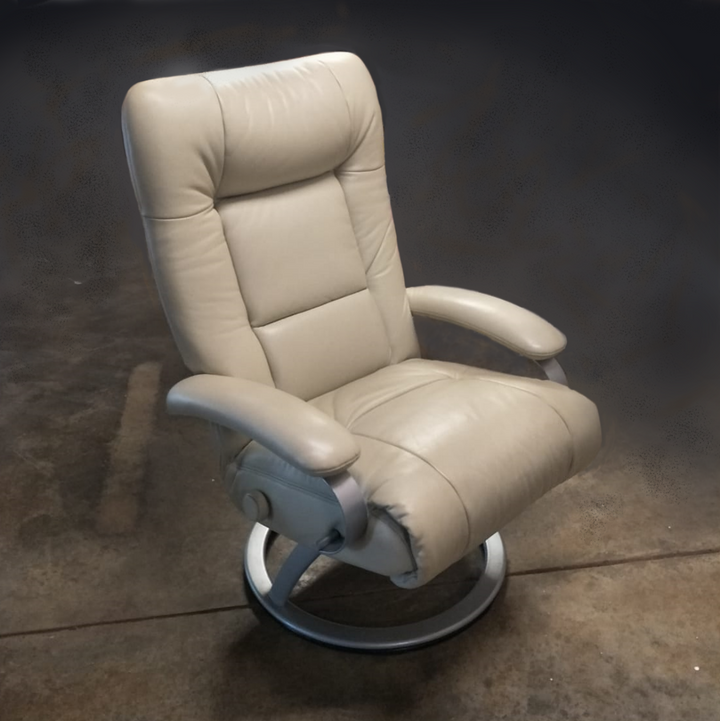

Before: ColouR Change
Pigmented (painted/coated) leathers can be recoloured with a new colour. That change can be lighter or darker. Some colours give coverage with fewer coats than others.
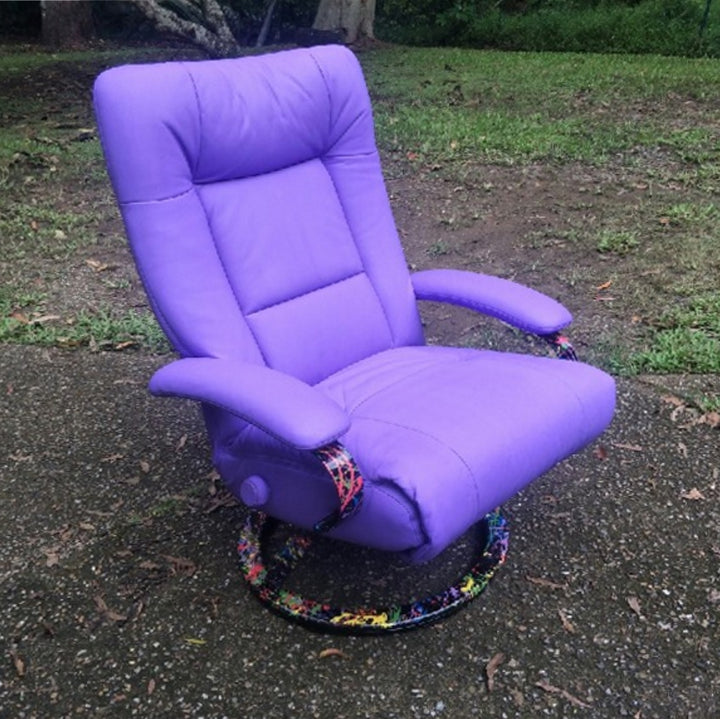

After: Massive range of colours to choose from
Go nuts with one of our 85 beautiful colours. The Repair & Recolour Kit includes surface prep, primer, colour and topcoat. This system replicates the tannery process applied to your pigmented leather when it was made.


Before: A Large tear in a non-load bearing area
Even large tears can be repaired when they are not in a load bearing area. Results vary, but anything would look better than this red tape.


After: A relatively discreet repair
A sub-patch was glued under the opening then the tear was glued back together. Leather filler was used to fill in any remaining gaps. After drying, the repair was refinished with a Repair & Recolour Kit plus an extra bottle of Colour (No.6) to replicate the two tone effect. To reinforce large tears, stitching the join before gluing, filling and colouring can lend extra strength to the repair.


Before: Cat Scratches
Pet damage happens. What more can we say?


After: cosmetic surface correction & recolouring
Whilst results can vary, a significant improvement is usually possible. With some sanding, gluing, and filling followed by recolouring, even a severe cat attack can be repaired.


Before: UV Faded Aniline leather
Aniline leathers can fade when exposed to UV light.


AFTER: Aniline Colour Restoration
The Aniline Restoration Kit was used to restore faded colour and leave a smooth, protective finish.


Before: OILY AREAS IN ANILINE LEATHER
Hair and body can affect isolated areas like headrests and armrests. Affected areas show as dark patches. If you decide to restore your couch, note that although oily areas can be covered, the oils can eventually undermine the adhesion of any coatings causing them to wear faster than other areas.


After: Feature images or videos
Our Aniline Restoration Kit lets you correct fading and lightly cover imperfections. Easy to apply and fast drying, it's easy to top-up and refresh as needed.
Is it too late?
You might be wondering if your leather is beyond repair. The most difficult repairs include:
- Large tears. Not impossible; just tricky and often detectable despite best efforts to conceal them
- Oily (soaked with hair & body oil). Oil prevents optimal adhesion and can compromise the durability of coatings
- Brittle (water & heat hardened)
- Seams (in some cases, hand stitching can provide the holding power whilst recolouring can do the cosmetic work)
- Peeling and flaking man-made materials (faux, vinyl, bonded, bi-cast). These materials are considered disposable.
- Load-bearing tears (carries human weight)
- Lots of tears and holes (leather is weak and lacks structural integrity)
If the damage is advanced, it may not be worth attempting repairs. There are, however, instances where even difficult repairs can deliver satisfactory results. Whether its worth it or not depends on your priorities.
Challenging repairs with potentially limited durability


heavily impregnated with Oil
Embedded hair and body oil can prevent the adhesion of glue, filler and leather coatings. Greasy leather looks blackish in colour. Pigmented leathers can also absorb oil. Look for black leather under the coatings. With future touch-ups, grease areas can be managed for the life of the leather.


Brittle and SEAMS
Hardened, brittle leather with sharp, stiff edges can't be repaired.
When leather isn't brittle, seams can be glued but may not hold human weight. However, when reinforced with hand stitching and gluing, result can be more durable. If applying colour, look for a Repair & Recolour Kit.


Large tears
Keep an open mind when repairing rips that are larger than a few centimeters. The repair may be evident and it may not stand up to heavy load-bearing use. That said, a pleasing cosmetic result may be achievable using a Repair & Recolour Kit. You can also glue a patch of leather over the area which can deliver a satifactory improvement and slow further damage.


Multiple tears
Repairs are possible but lots of tears indicates that the leather is generally weakened or compromised. A weak substrate does not hold repairs or colour as well as a strong one. If you just need a good cosmetic result, go for it as a satisfying cosmetic result can be achieved using a Repair & Recolour Kit. If you need a robust functional result, repair and colour work may buy you more time before the furniture needs to be replaced.


Man Made materials
Many man-made 'leathers' are difficult to repair. Whilst immediate results can be pleasing, the unstable nature of the faux material can undermine your repair efforts. Sometimes, gluing the raw edges can slow the delamination process, making colour work more viable. Look for a Repair & Recolour Kit.


load bearing
Tears in load bearing areas such as seat cushions or car seats can be repaired but may not hold under human weight. Hand stitching the leather together before repairing with a Repair & Recolour Kit can deliver a stronger result. It's possible to create a pleasing cosmetic result. If you also avoid applying weight to the area, your repair could last indefinately.